Let’s Talk Presets
A guest article by Mara De La Torre


Hola, VERO family! Mara de la Torre here. A Spanish professional photographer specializing in travel and commercial photography.
Have you ever experienced the frustration of using a preset only to find it doesn't quite achieve the desired look? If so, this article is for you.
Since the use of presets in photo editing became widespread, many people thought they could edit an image with a single click, mainly due to the publicity generated at the time, promising one-click editing. The reality is that no miracle preset can edit any image in one click. So what is a preset for, and how can they help you edit a photograph?
The technical definition of a preset is a series of adjustments and parameters regulated through editing software to give a photograph a specific look. To put it in a much more colloquial and straightforward way, a preset is a filter that we add to a picture to achieve a particular look.
“Whether you are a hobby photographer or a professional photographer, presets will make your life easier and your workflow more efficient. ”
After years of experimenting and tweaking, I can now use my own presets to edit my content, from trips to commercial work. It allows me to share the work so much more efficiently with clients.
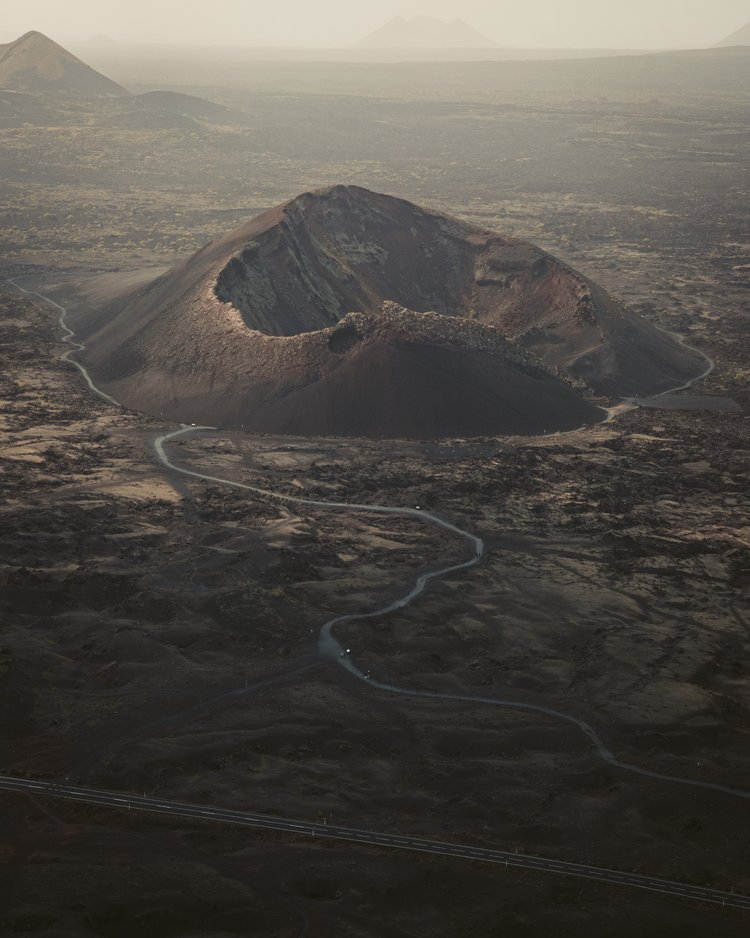
Let’s dive into an actual editing process of one of the pictures I took of the most iconic volcano of Lanzarote (Canary Islands), El Cuervo. This picture was shot with the Nikon D850 and the Nikon 24-70 mm 2.8 on a hazy day.

The RAW image is flat due to the haze, which can give us an idea that any preset will work in one click as the conditions were not ideal, and we will have to make the haze disappear with the editing software to bring back all the details of this volcanic cone.
After checking in all my preset galleries, I decided to use the preset Desaturated from my Dream Collection that I designed as a base to start when we have flat images that are difficult to edit. Once the preset is applied, in this case, it changes the image’s tones, reduces a bit of haze, and gives a bit of contrast, but more is needed to complete the process.
I remember that day, and it was a warm day with warm tones over the lands, but the temperature of this preset is colder than what I want to show in the final result, so we will be changing some basic parameters to adapt it.
We played with the temperature to make the picture look warmer with the tint, as well as exposure and contrast. So, after applying your preset, you will have to check that the basic parameters of the photo look as you want them to look and modify them slightly to fit your image.
“We need to move only basic parameters. Colors and curves should be left as per the adjustments in the preset as
These two modules are the ones that give the consistent base for the look, and that’s precisely what we ask for a preset.”

This image is looking much more attractive and realistic. It’s turning out so well, and you might be tempted to leave it this way, but I’d advise not to. It’s like writing a book without the last chapter. It might be a good story, but we will always want to close it, so to avoid this feeling in our image, let’s make the magic with a potent tool: masking.
“Masking is a game changer that helps us to give that little touch to the image by independently editing the sections of the picture we are interested in.”
Mastering masking will take some time, and here is where you have to apply all that you know about light and composition. Masks can be used to increase some parameters and decrease them. In our case, we want to make the cone pop up and direct our sight to it.
We will use the path in our image to accompany us to the cone and give it a little more light while lowering the exposure of the road's surrounding areas. Also, we will recover the red tones in the cone by increasing the saturation and shadows in this area. Last but not least, to isolate our subject more, we will recover a bit of the haze from the background of the cone and give it some light. The final image is ready and fits perfectly with the scene I saw that day and my artistic preferences.

If you are not used to using masks, you may be overwhelmed. Don’t worry. Keep trying until you like it and understand how to use it on your images. Read about light and composition, allow yourself to fail, and try again. This is a beautiful part of the process, and I assure you that you will love this tool after many hours.
Presets are truly useful. They have provided a solid base for our edits, but they should be OK with learning photo editing techniques and settings. It is always essential to know and understand how the settings work so that you can customize and adapt the presets to your specific needs.
Having accompanied me in this little editing adventure has helped you; now it's your turn. Take that photo resisting you, apply your favorite preset, and follow these steps to get the most out of it. I’d love to see what you create in VERO with these tips (please tag me!)
Mara de la Torre is a travel photographer and storyteller who blends a passion for nature with a love for exploration.
To discover more creator profiles and exclusive editorial content, download VERO and explore the VERO Featured page in-app.


Road to Belonging